TABLE OF CONTENTS
Overview
Active Directory (AD) is a directory service developed by Microsoft for Windows network domains. An AD domain controller responds to security authentication requests within a Windows domain. Most Active Directory logging, especially for security-related activity, is done via the Windows Event Log.
Active Directory logs are essential for many reasons. They provide insights into user and group activities, including changes to permissions, account lockouts, failed logins, and other security-related events. AD logs can help in detecting suspicious activity or security breaches, troubleshooting issues, and monitoring the health and performance of your Active Directory environment. Additionally, you can use your domain controller logs to meet regulatory compliance requirements and auditing policies.
Active Directory security logs
These logs contain information about authentication and authorization attempts, such as successful and failed logins, changes to security policies, and account lockouts.
Directory Service logs
These logs provide information about Active Directory operations, such as changes to user accounts, group memberships, and permissions.
Ultimately, both fall into the "critical logs" category from an IT security perspective.
NXLOG is used to process the collected information from Windows event logs and forward these logs to the ADR CCE Server. NXLog uses Apache-style configuration files.
Reference links
Collect Microsoft Active Directory domain controller logs
Install NXLog
Download the latest NXLog Agent
- Log in to the Windows Log Collector / Active Directory Domain Controller System with administrative rights.
- Download the latest version of NXLog Community Edition. It is easiest to choose the Windows MSI file, which includes an installer.
Use the link below for the community edition:
Download - NXLog Community Edition and install the NXLog Community Edition with the appropriate rights.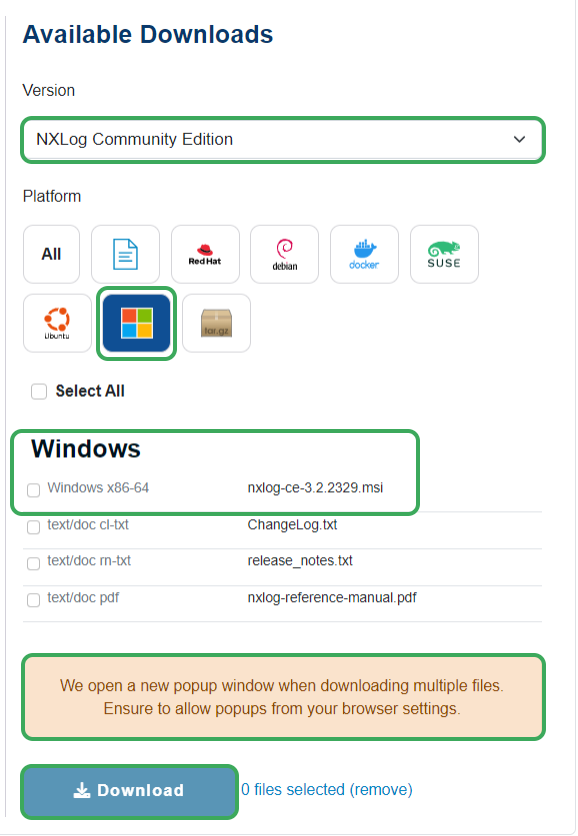
Copy the Configuration
## This is a sample configuration file. See the nxlog reference manual about the
## Please set the ROOT to the folder your nxlog was installed into, ##otherwise it will not start.

define ROOT C:\Program Files\nxlog
##define ROOT C:\Program Files (x86)\nxlog

Moduledir %ROOT%\modules
CacheDir %ROOT%\data
Pidfile %ROOT%\data\nxlog.pid
SpoolDir %ROOT%\data
LogFile %ROOT%\data\nxlog.log

<Extension _json>
  Module xm_json
</Extension>

define aisiem \
1, 2, 3, 4, 5, 6, 7, 8, 9, 10, 11, 12, 13, 14, 15, 17, 18,19, 20, 21, 22, 23, 24, 25, \
26, 27, 28, 29, 41, 100, 104, 106, 110, 140, 141, 200, 201, 257, 258, 259, 260, \
261, 262, 500, 517, 520, 528, 529, 530, 531, 532, 533, 534, 535, 536, 537, 538, \
539, 540, 551, 552, 565, 592, 600, 601, 602, 608, 609, 621, 622, 626, 627, 628, \
629, 630, 632, 636, 642, 644, 645, 647, 663, 664, 671, 673, 675, 676, 677, 679, \
680, 681, 682, 683, 684, 689, 690, 692, 703, 704, 1001, 1006, 1007, 1008, 1015, \
1033, 1034, 1074, 1102, 1116, 1117, 1118, 1119, 1125, 1200, 1201, 1203, 1204, \
1205, 1206, 1207, 2003, 2100, 3200, 3207, 3301, 3304, 3401, 3403, 4000, 4103, \
4104, 4608, 4609, 4616, 4618, 4624, 4625, 4634, 4647, 4648, 4649, 4656, 4657, \
4658, 4659, 4660, 4661, 4662, 4663, 4670, 4672, 4673, 4674, 4685, 4688, 4690, \
4697, 4698, 4699, 4700, 4701, 4702, 4703, 4704, 4705, 4707, 4717, 4718, 4719, \
4720, 4722, 4723, 4724, 4725, 4726, 4727, 4728, 4729, 4730, 4731, 4732, 4733, \
4734, 4735, 4737, 4738, 4739, 4740, 4741, 4742, 4743, 4744, 4745, 4746, 4747, \
4748, 4749, 4750, 4751, 4752, 4753, 4754, 4755, 4756, 4757, 4758, 4759, 4760, \
4761, 4762, 4763, 4764, 4767, 4768, 4769, 4770, 4771, 4772, 4773, 4775, 4776, \
4777, 4778, 4779, 4780, 4781, 4782, 4783, 4784, 4785, 4786, 4787, 4788, 4789, \
4790, 4791, 4793, 4794, 4797, 4798, 4799, 4800, 4801, 4802, 4803, 4946, 4947, \
4950, 4954, 4964, 4985, 5001, 5004, 5007, 5010, 5012, 5025, 5031, 5136, 5137, \
5140, 5141, 5142, 5143, 5144, 5145, 5152, 5153, 5155, 5157, 5376, 5377, 5447, \
5712, 6005, 6006, 6008, 6416, 7034, 7035, 7036, 7040, 7045, 8003, 8004, 8007, \
10015, 10029, 11629, 11707, 11708, 23010, 23050, 23090, 34112, 34113, 64004

<Input in>
      Module im_msvistalog
      Query <QueryList>\
                  <Query Id="0">\
                        <Select Path="Security">* </Select>\
                        <Select Path="Application">* </Select>\
                        <Select Path="Setup">* </Select>\
                        <Select Path="System">* </Select>\
                  </Query>\
            </QueryList>
            <Exec>
                  if ($EventID NOT IN (%aisiem%)) drop();
            </Exec>
</Input>

<Output out>
  Module om_udp
  Host CCE_IP
  Port 5154
  Exec to_json();
</Output>

<Route 1>
  Path in => out
</Route>
Run Notepad or Notepad++ with administrative rights
Open the Nxlog configuration file at C:\Program Files\nxlog\conf\nxlog.conf
Open the nxlog.conf file.
Replace the entire configuration file by pasting the following, and replacing the variables below.
Note. Make sure to replace the variable (IP Address of ADR Collector) mentioned in line no 52 with the actual ADR Server IP address.
Restart Nxlog
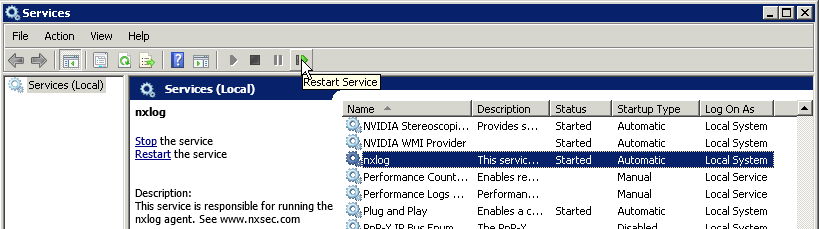
net stop nxlog
net start nxlog
Audit Policy Configuration in the Server
Option 1: Configure a Local Audit Policy
Open the search bar, type Local security policy, and hit Enter.
In the console that pops up, look for Local policies and click on Audit policy.
It is best practice to use the Local Security Policy only for viewing audit settings. (To edit them, use GPOs.)
As the name implies, it is basic in nature. There are nine general audit settings in this policy, as shown below.
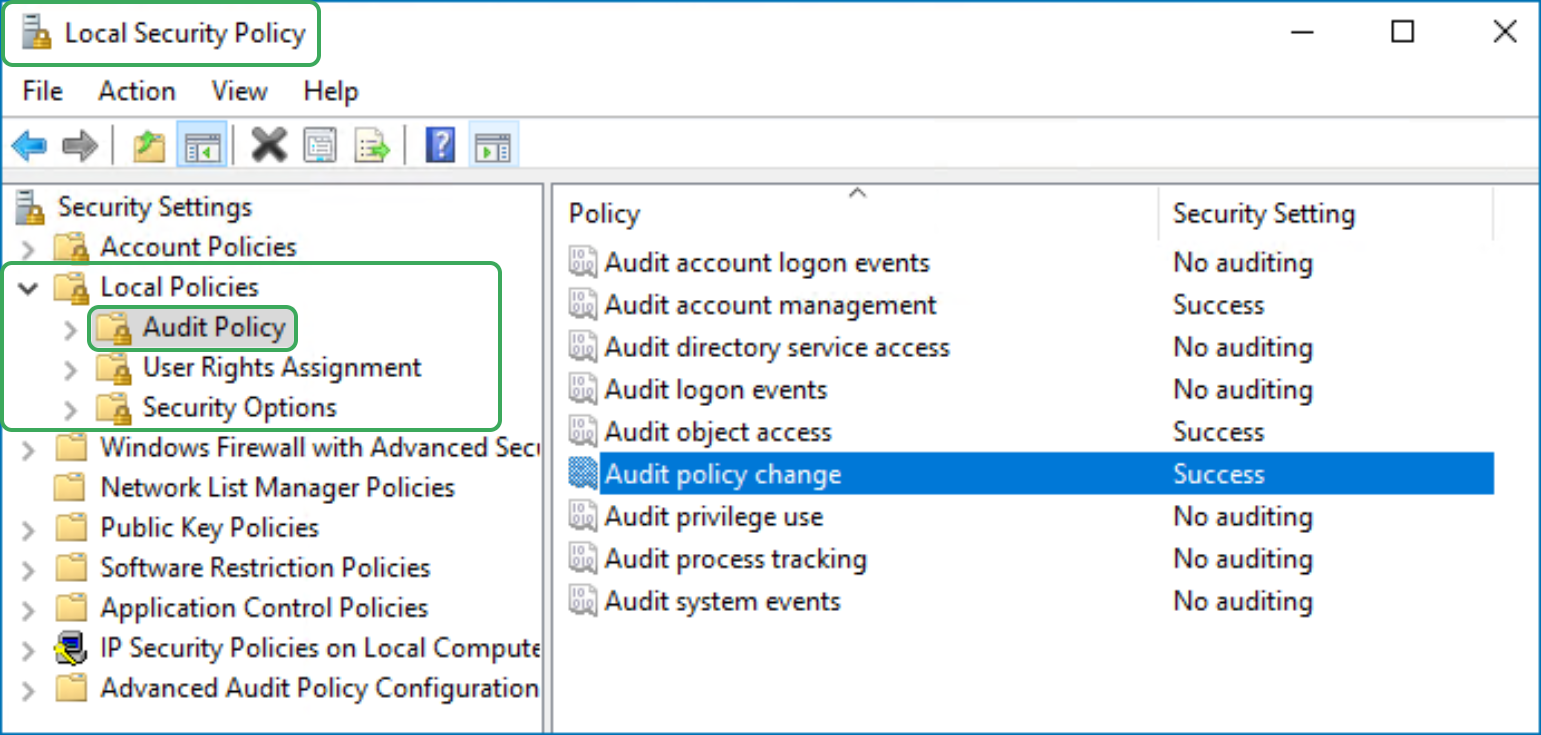
Success: Select this check box to audit successful attempts for the event category.
Failure: Select this check box to audit failed attempts for the event category.
| Policy Name | Audit Events |
|---|---|
Audit account management | "Success" |
Audit object access | "Success" |
Audit policy change | "Success" |
Right-click all nine general audit categories one by one, and then select Properties with "Success" & "Failure". and select OK.
Option 2: Configure an Audit Policy via Group Policy
Personnel with administrative rights can use Group Policy Objects to apply configuration settings to multiple servers in bulk.
To configure audit policies (Windows Server 2008 R2 and later)
Follow these steps to enable the Advanced Audit Policy and configure DS auditing:
Log in to the server as a domain administrator.
Load the Group Policy Management Editor from Server Manager > Tools.
Expand the Domain Controllers organizational unit (OU), right-click on Default Domain Controllers Policy, and click Edit….
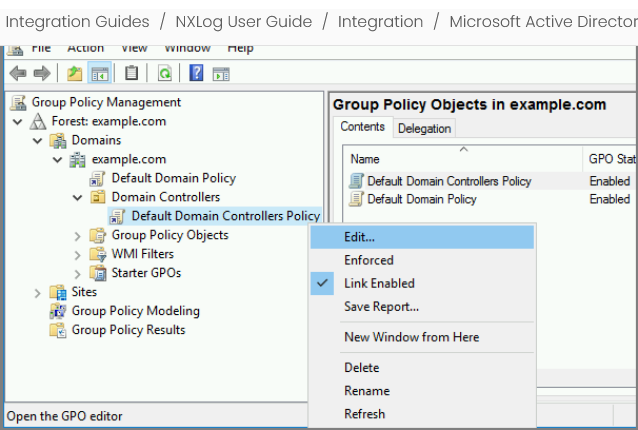
Expand Computer Configuration > Policies > Windows Settings > Security Settings > Advanced Audit Policy Configuration > Audit Policies > DS Access.
Enable all the policies in this category to start auditing Directory Service access.
Refer to Step-By-Step: Enabling Advanced Security Audit Policy via DS Access on Microsoft Learn for more information on the Advanced Audit Policy and descriptions of event IDs.
| Policy Sub-node | Policy Name | Audit Events |
|---|---|---|
Account Management
| Audit Computer Account Management | "Success" |
| Audit Security Group Management | "Success" | |
| Audit User Account Management | "Success" | |
| Object Access | Audit Handle Manipulation | "Success" |
| Audit Other Object Access Events | "Success" | |
| Audit Registry | "Success" | |
| Audit File Share | "Success" | |
| Policy Change | Audit Audit Policy Change | "Success" |
When finished, run the gpupdate /force command to force group policy update.
Reference link: Configure audit policies for the domain controllers
Verification (MSSP Only)
Verification through ADR GUI Console
Open the ADR GUI Console with the appropriate administrative rights user.
Navigate to System Monitoring and drop down to System >> Logs/Flows Collection Status.
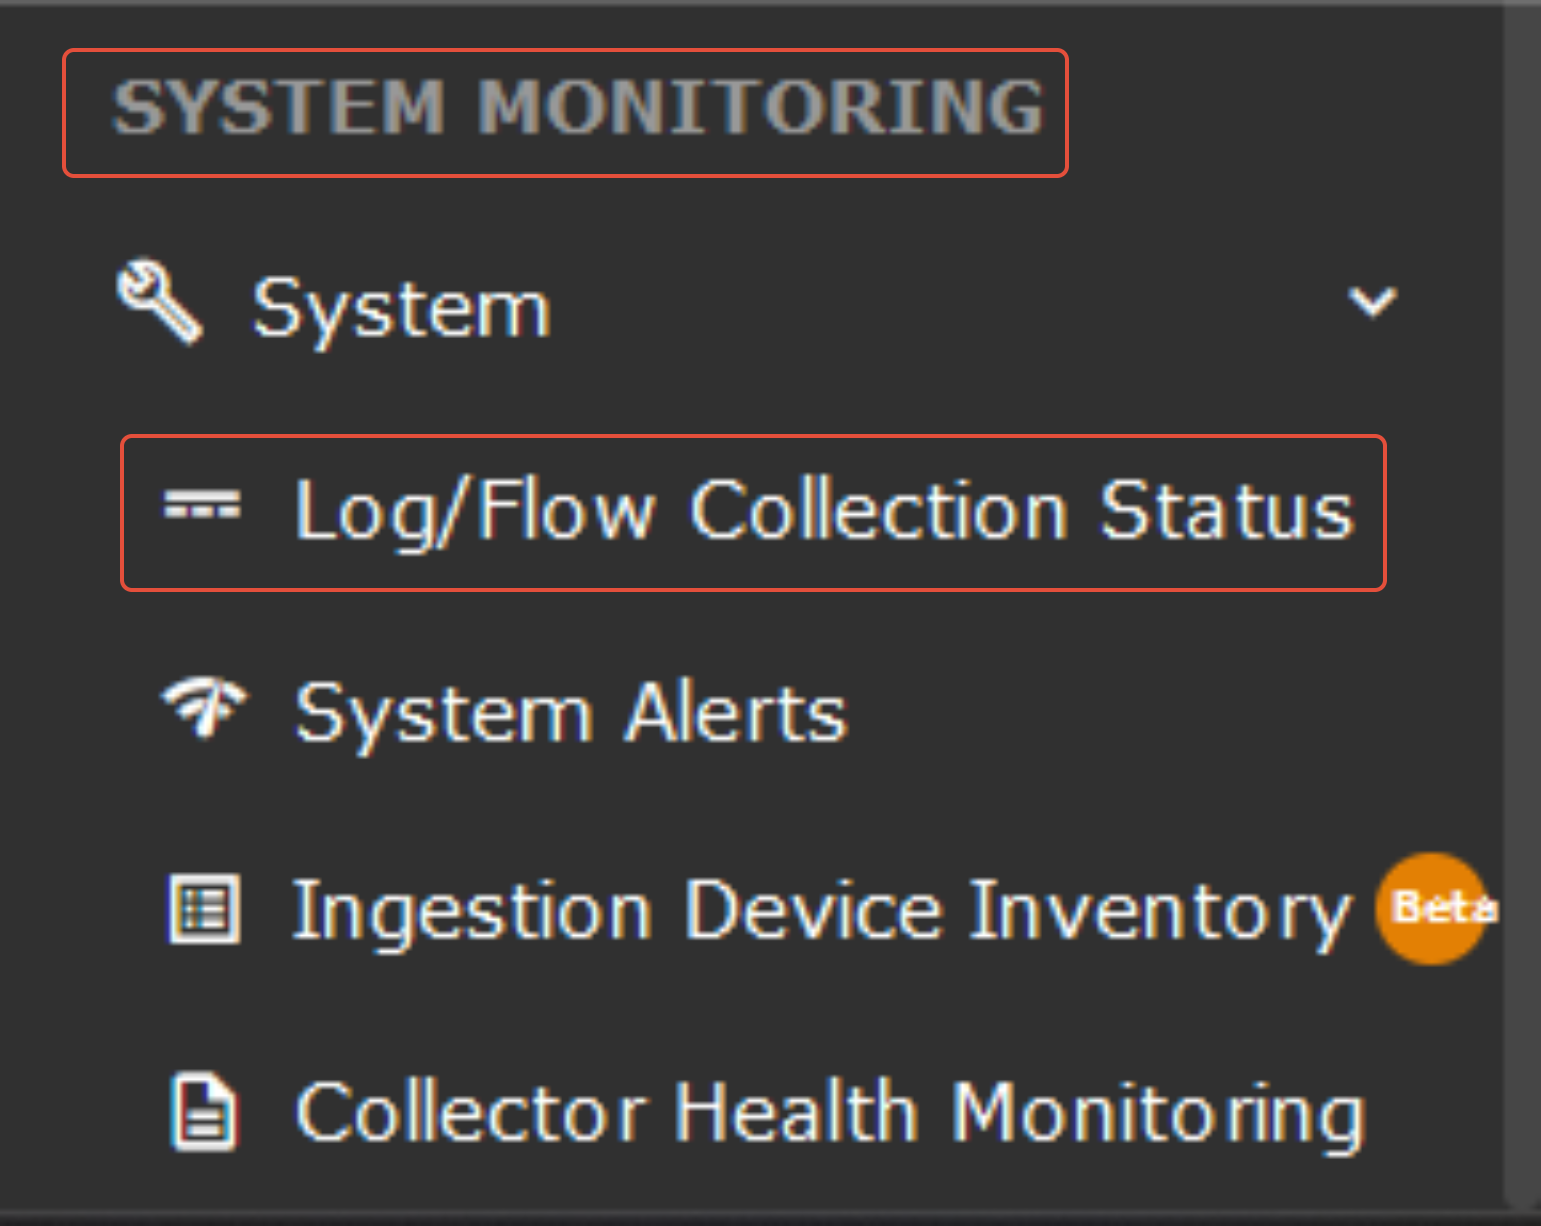

Under the Source device IP address section, the device "MS_Windows" configured will be reflected.
Verification Through the CCE Server
The following command should be run on the CCE server to check whether or not we are getting logs.
sudo tcpdump -i any port 5154 and host <IP address> -s0 -AAAWas this article helpful?
That’s Great!
Thank you for your feedback
Sorry! We couldn't be helpful
Thank you for your feedback
Feedback sent
We appreciate your effort and will try to fix the article